Self Portrait Project
|
Project Objective: Create a self-portrait or develop a series of self portraits inspired by your personal and/or intellectual growth this year.
|
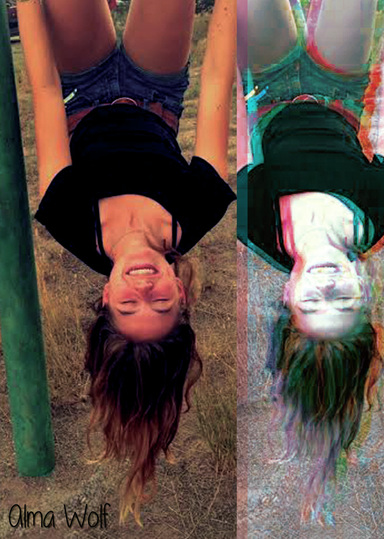
My self portrait
|
Teacher Creature Project
Our Project Objectives: Envision and Critique to reflect. Recognize, demonstrate, and debate philosophic arguments about the nature of art and beauty (aesthetics).
Progress of Project, Version One to Final

|
Project ReflectionThe teacher creature project was a three-week long photoshop project. We were required to choose one or more teachers and use our knowledge of photoshop to turn them into a creature of our choice. For my project, I chose the ninth grade physics teacher, Brian Morgan; the digital arts teacher, Roxy Mcknight; and an Algebra 1 teacher, Brendan Schafer. I turned Brian into a cloud, Roxy into the sun, and Brendan into a yeti. They are all on Mount Everest. The hardest part of this project for me was the background. The image that I chose for the background had a climber on Mount Everest, so I had to remove the climber. This was difficult, but I used the clone stamp tool and the patch tool, and eventually removed the climber. Before this year and project, I had never really considered myself an artist. Usually, I do better in math and science oriented classes; however, this year has been different. Roxy has taught us all about art and design, and I am beginning to consider myself more of an artist. One of the objectives of this project was to try to recognize our personal artistic style. While I do not think my personal style is fully developed, I do feel that this project has helped me identify certain attributes that I tend to incorporate into my art. I would say that my style embraces color, organization, and realism. I love to use bright colors, and patterns are particularly appealing to me. Also, when given a task in photoshop, I want to make it look as realistic as possible. This isn’t necessarily represented in my teacher creature project, but I generally tend toward making realistic images and taking the project seriously.
While we were exploring our personal styles in this project, we were also asked to consider the underlying structures in our culture that guided the creation of our artwork. My teacher creature image was definitely influenced by popular culture. While I didn't include any images of celebrities or presidential candidates (these are two common topics right now), my image was based around the outdoors, namely Mount Everest. In my opinion, the outdoors are a very popular topic in our culture. It is very "sexy" to be outdoors and to love the outdoors. This most likely influenced my, and other students, teacher creature projects. Something else that influenced my art is humor. Most people want their images to be funny, because being funny is more approachable and likable. |
Photoshop Tutorials

Original Image (before)
|
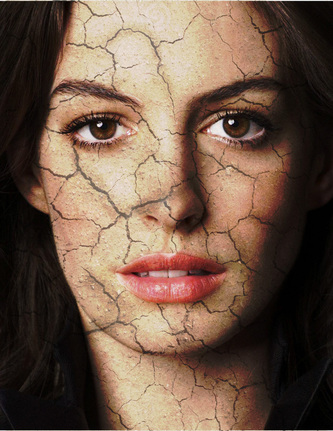
Photoshop Image (after)
|
- I used an image of Anne Hathaway and another image of cracked dirt. I put the image of cracked dirt over the face, turned down the opacity, erased the cracks on her lips, hair, and eyes, and then darkened the lines.
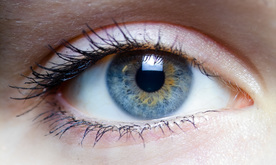
Original Image (before)
|
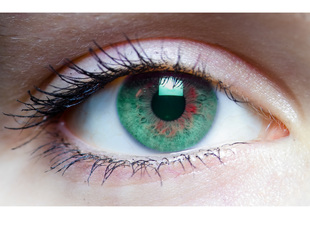
Photoshop Image (after)
|
- I selected the colored part of the eye (iris) and edited the hue/saturation of the selection.

Original Image (before)
|

Photoshop Image (after)
|
- I used the warp tool to warp a copy of the canine teeth.

Original Image (before)
|

Photoshop Image (after)
|
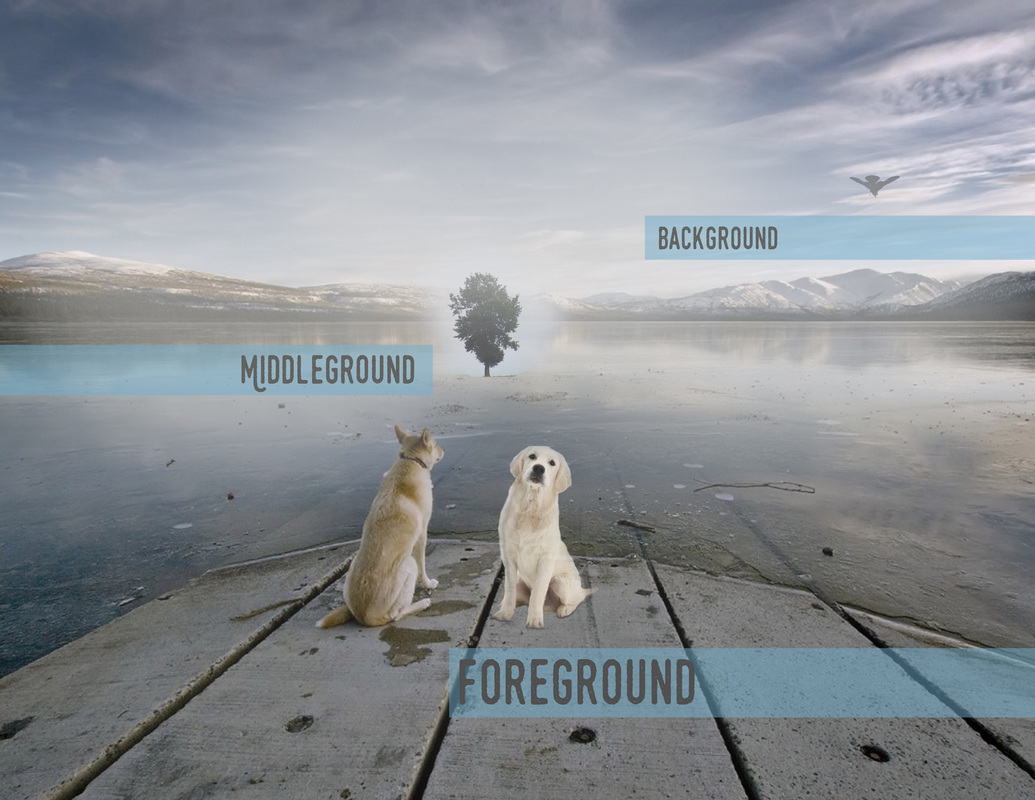
Understanding Distance with Scale and Proportion
To begin learning about Digital Arts and using photoshop, we did a short project on understanding distance and scale. We had to find an image on the internet and then add elements to the background, middleground, and foreground. I found this picture of a lake and mountains, with one dog in the foreground. I added the other dog, the tree, the bird, and the haze. In order to create this image, I learned several things about scale and proportion and how elements of an image look when they are in different grounds.
The tools that I used in photoshop to create this image included some of the selection tools, and also the eraser tool and blur tool. I have used photoshop before this project, but I learned how to refine edges on a selection. I am excited to continue learning how to use photoshop to enhance and edit photos.
- When an element is in the foreground, it is large, colors are be vibrant, you can see crisp texture, and individual details and parts are visible..
- When an element is in the middleground, it is medium sized, the colors are less vibrant, the details and texture become softer and blurred,
- When an element is in the bakground, it is seen as small, all objects blur together and have soft edges, the colors are less contrasting and hardly vibrant, and haze is present.
The tools that I used in photoshop to create this image included some of the selection tools, and also the eraser tool and blur tool. I have used photoshop before this project, but I learned how to refine edges on a selection. I am excited to continue learning how to use photoshop to enhance and edit photos.
Helpful Resources
Photoshop CC Basics: http://jetsetcom.net/useful-resources/photoshop-cc-resources.html
Show and Tell Photoshop Basics: http://simplephotoshop.com/photoshop_tools/index.htm
Show and Tell Photoshop Basics: http://simplephotoshop.com/photoshop_tools/index.htm
